diy bunting banner
0Monday, June 13, 2011 by norelle & co.
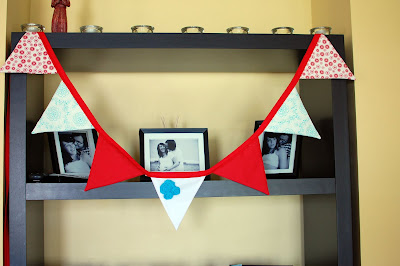
As explained in my previous post, my daughter just celebrated her 3rd birthday. Besides the homemade tissue paper pom poms and cupcakes, I also made a bunting banner. I love how classic they are, and how they can be used for years to come! First, choose your colour scheme, and choose fabrics accordingly. I chose the cheapest fabrics I could find that matched the colour scheme I was going for at our local fabric store. You can use ribbon or rope to attach your banner triangles together, but I chose quilt edging (especially since it was buy one meter get one free!).
How-to Bunting Banner
Step 1: Fold fabric in half/double the fabric, printed side together, and cut out triangles at your desired size. If you're worried about not being able to get them even, cut out a triangle on a piece of paper or cardstock and use that as your guide for each triangle. Repeat which each of the fabrics you have chosen, until you get your desired number of triangles.
Step 2: Pin your triangles together to keep them in place, and using the 2mm setting on your sewing machine, sew down the sides of your triangle until you get to the bottom point. (Do NOT sew the top of the triangle, as you will have to flip it right side out). Continue with each triangle.
Step 3: Trim the sewed edges of your triangle to get less bulk when you flip your triangles right side out. I used pinking shears, but you can use regular scissors, as long as you do not get too close too your stitching.
Step 4: Flip your triangles so your pattern is facing out. I used a dull pencil to poke out the tip of my triangle. Iron your triangles so they're nice and flat.
Step 5: Lay your triangles our on your quilt edging, opening up the fold and placing the top of each triangle at the top of the folding of your edging, I left about half an inch space between each triangle. Pin each triangle in place to your edging.
Step 6: Starting at one end of your edging, begining stitching the edging together, continue sewing across all of your triangles, until you get to the opposite end of your edging.
And there you have it, an easy how-to bunting banner! You can add any decals you like to your banner, such as letters, felt shapes, or even rolled fabric flower like I did. Just attatch with hot glue and you're good to go!
As much as I wish time would slow down, and my baby girl wasn't growing so fast, I at least look forward to decorating for all of her birthday parties to come. It will only get even more exciting as she gets older, as she'll has more little friends over for parties and even more fun will ensue!
Cherish the time you have with your wee ones, they grow too fast!
-A
Category bunting banner, fabric, sewing
Pages
Powered by Blogger.

- norelle & co.
- we all have places go to, things to do, and people to see. i am a mom, a forever student, a soon-to-be teacher, an earth sympathizer, and a want-to-be do it yourselfer. this is the way i see life, with all the things i love about it.


